About MMOA Daily Checklist Data Collection Calibration REDCap Task Descriptions Resources
About MMOA
Study Title: Markerless motion capture for the assessment of human movement in orthopaedic populations and asymptomatic individuals
Clinical assessment plays a crucial role in all facets of patient care, from diagnosing the specific disease or injury, to management and monitoring of therapeutic or rehabilitation strategies to ameliorate dysfunction. However, the ability to assess and quantify functional mobility continues to be limited and largely based on subjective estimates of performance. Such simple subjective rating systems are necessarily coarse to ensure reliability and validity, but such coarseness makes it difficult to identify subtle changes in function.
Technological developments in computer vision and machine learning have enabled the development of markerless motion capture technology. This technology can provide objective biomechanical assessments in a readily accessible and time-efficient system in the clinic for the first time. The computer vision and machine learning approach to estimate anatomical landmarks from standard video significantly reduces the time and burden of data collections compared to conventional marker-based motion capture. Markerless motion capture removes the operator effect of placing markers, which has previously limited the ability to pool marker-based biomechanics data due to large operator effects and site variation in data collection. Complexity, restrictive environments, and time requirements of marker-based protocols have also contributed to limited uptake of objective motion capture in clinical settings. Markerless motion capture provides an opportunity to develop innovative approaches to assess functional status of orthopaedic patients in a more quantitative fashion by leveraging both ease of data collection and the ability to pool data across multiple centres.
This study aims to collect biomechanical data at multiple sites to both determine the feasibility of multi-centre markerless motion capture and to develop biomechanics-based objective functional assessment tools for orthopaedic patients. This technology will be used to investigate the ability to quantify functional mobility in orthopaedic populations (including patients who are osteoarthritic or post-total joint replacement) and identify differences compared to a control population. As a preliminary evaluation, we will first evaluate a defined clinical group, specifically waitlisted total knee replacement patients, to quantify relative functional severity between patients.
Lead Site: Kingston Health Sciences Centre, Queen’s University, Kingston, Ontario
Principal-investigator:
Kevin Deluzio, PhD, Human Mobility Research Laboratory, Mechanical and Materials Engineering, Queen’s University
Associate investigators :
Elise Laende, PhD
Jereme Outerleys, MASc
Gavin Wood, MD, FRCS(C)
Steve Mann, MD, MMEd, FRCS(C)
Ryan Bicknell, MD, MSc, FRCS(C)
Daniel Borschneck, MD, FRCS(C)
Mark Harrison, MD, FRCS(C)
Aaron Campbell, MD, FRCS(C)
Stephen Scott, PhD
Scott Selbie, PhD
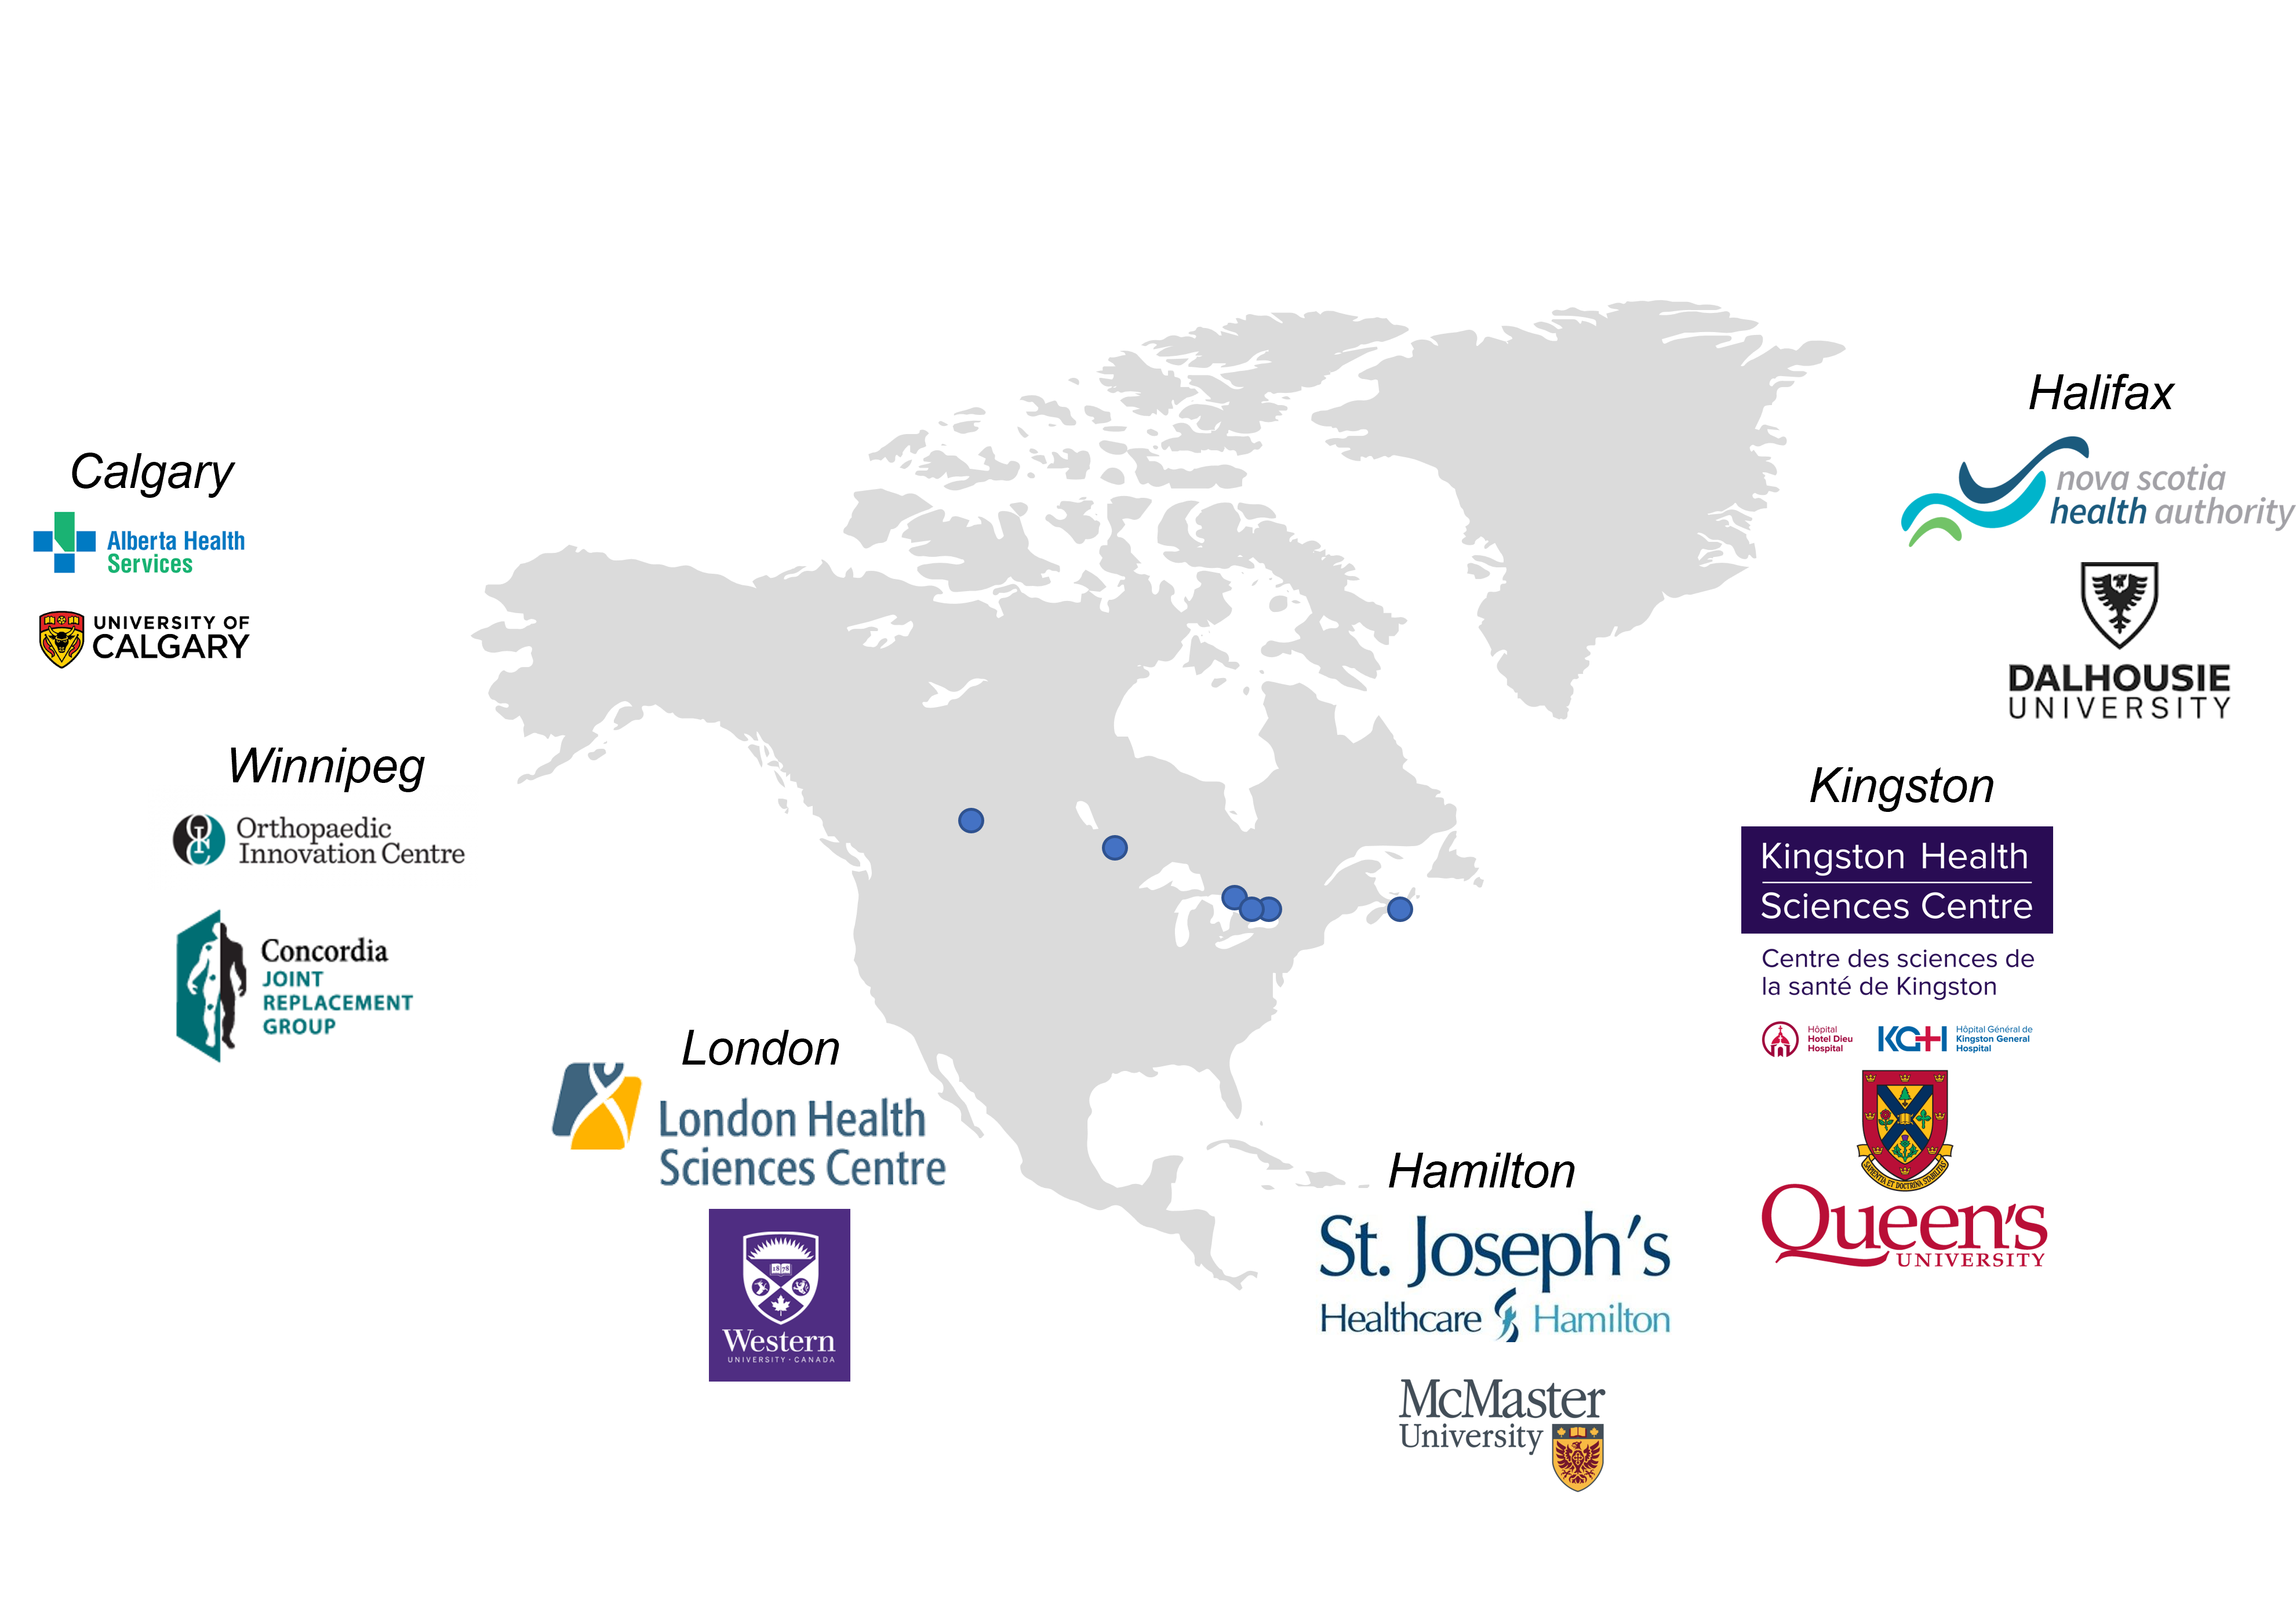
Participating Sites:
QEII Health Sciences Centre, Dalhousie University, Halifax, Nova Scotia
Michael Dunbar, MD, FRCSC, PhD
Glen Richardson, MD, MSc, FRCSC
Janie Wilson, PhD
St. Joseph’s Healthcare, McMaster University, Hamilton, Ontario
Anthony Adili, P.Eng, MD, FRCSC
Dylan Kobsar, PhD
Concordia Joint Replacement Group, Concordia Hip and Knee Institute, Orthopaedic Innovation Centre, University of Manitoba, Winnipeg, Manitoba
Eric Bohm, MD, B.Eng, MSc, FRCSC
Thomas Turgeon, MD, FRCSC
Trevor Gascoyne, MSc, Peng
London Health Sciences Centre, Schulich School of Medicine & Dentistry, Western University, London, Ontario
Brent Lanting, MD, FRCSC
Doug Naudie, MD, FRCSC
Matthew Teeter, PhD
Alberta Children’s Hospital, Foothills Hospital, University of Calgary, Calgary, Alberta
Ranita Harpreet Kaur Manocha, MD, MSc, FRCPC
Elizabeth Condliffe, PhD, MD, FRCPC
Sarah Manske, PhD
Koren Roach, PhD
Day-to-Day Checklist
Start of day
- Navigate to 169.254.200.200 on a web browser to access the Sony Camera Control Box interface.
- Turn on all Sony RX0 II cameras.
- Select all cameras and format (erase) the memory cards.
- Check battery, Video Sync, and TC Sync status on all cameras.
- Record the chessboard calibration trial.
** Remember to show the calibration QR code to a designated camera before starting the calibration trial. **
- Note down the trial in the subject-action-assignment sheet.
- Turn off all cameras.
When a participant arrives
- Ask the participant to complete consent, demographics, and questionnaires via REDCap.
- Navigate to 169.254.200.200 on a web browser to access the Sony Camera Control Box interface.
- Turn on all Sony RX0 II cameras.
- Check battery, Video Sync, and TC Sync status on all cameras.
- Record the functional task trial.
** Remember to show the Encounter ID QR code to a designated camera before starting the first functional trial. **
- Note down each trial in the subject-action-assignment sheet
- Turn off all cameras.
- Study staff completes Clinical Status and Data Collection Checklist in Visit-Data and enters Study Staff details in Intake via REDCap.
End of day
- Navigate to 169.254.200.200 on a web browser to access the Sony Camera Control Box interface.
- Turn on all Sony RX0 II cameras.
- Check battery, Video Sync, and TC Sync status on all cameras.
- Record the chessboard calibration trial.
** Remember to show the calibration QR code to a designated camera before starting the calibration trial. **
- Note down the trial in the subject-action-assignment sheet.
- Export all recorded videos to the database located on the server.
- Turn off all cameras.
Quick References
For a printable version of this checklist, see: MMOA Day-to-Day-Checklist.docx
For a subject-action-assignment template, see: YYYY-MM-DD-Ortho-Sony-subject-action-assignments.csv
For functional task prompts and instructions, see: 2023-10-16 Task Instructions for Multi-Centre Markerless OA Project.docx
Calibration QR Code:

Getting Started with Data Collection
Page overview:
Powering on the system
Instructions:
- Access the Sony Control Box interface by navigating to 169.254.200.200 in a web browser (e.g. Google Chrome, Microsoft Edge, Mozilla Firefox, etc.).

The Sony Control Box interface will display the Sony RX0 II cameras connected to the system.
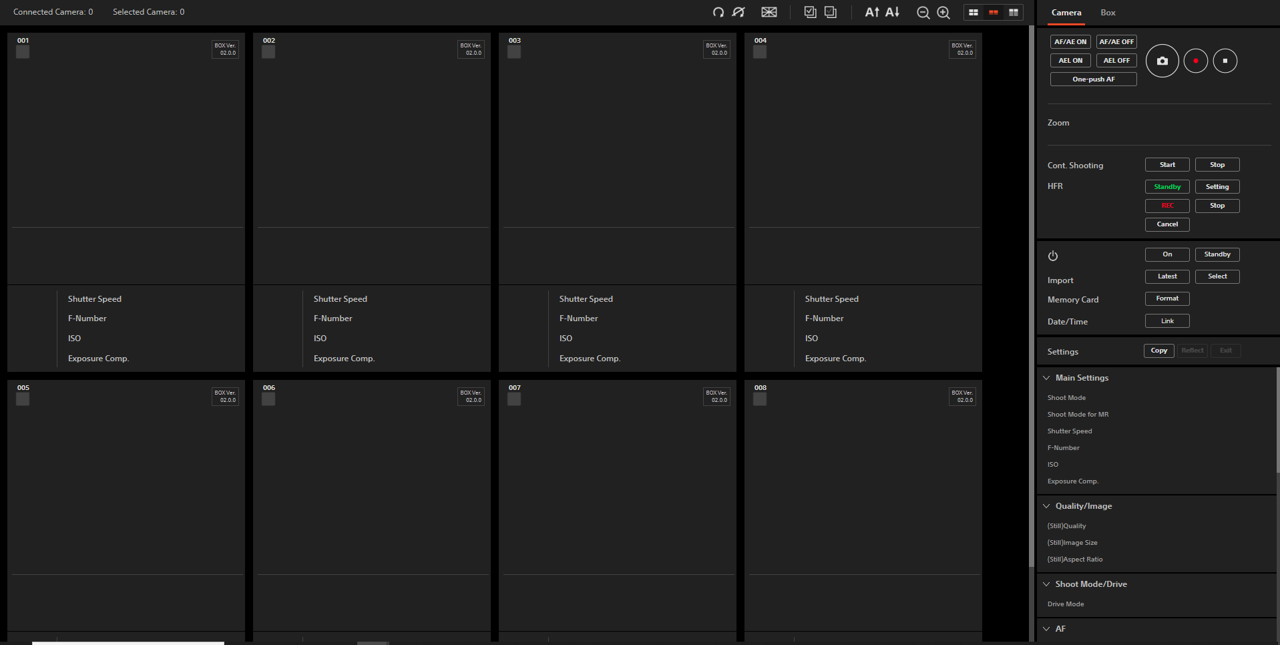
- At the top of the page, select all cameras.

- Power on all the cameras by clicking the On button.
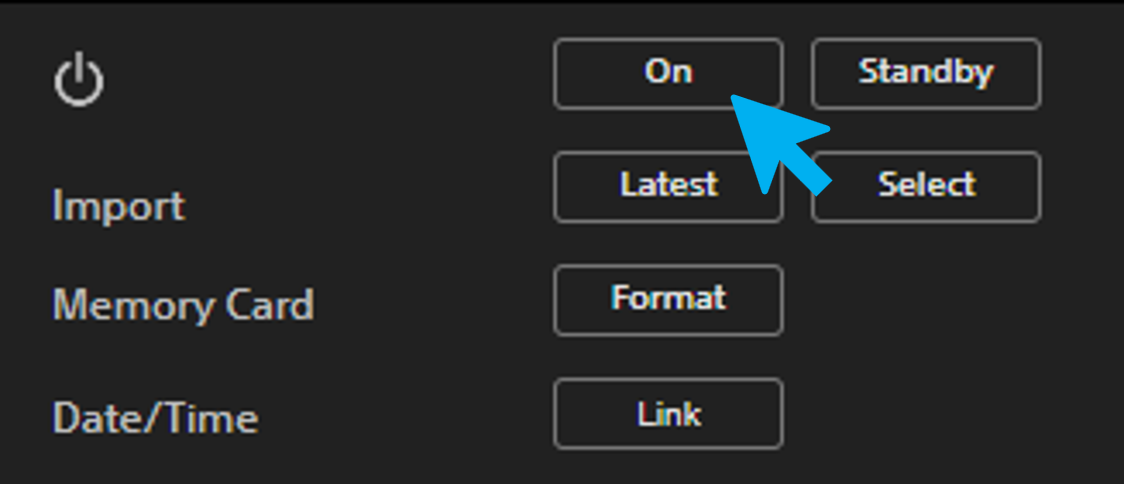
- Each camera view should now be visible and have an orange checkmark next to its camera serial number.

- Consider turning the cameras off to conserve battery by clicking the Standby button.

Checking and changing camera settings
Instructions:
- Select all cameras.
- Locate the settings panel in the bottom-right corner of the Sony Control Box interface.
- While all cameras are selected, adjust the camera settings to the following:
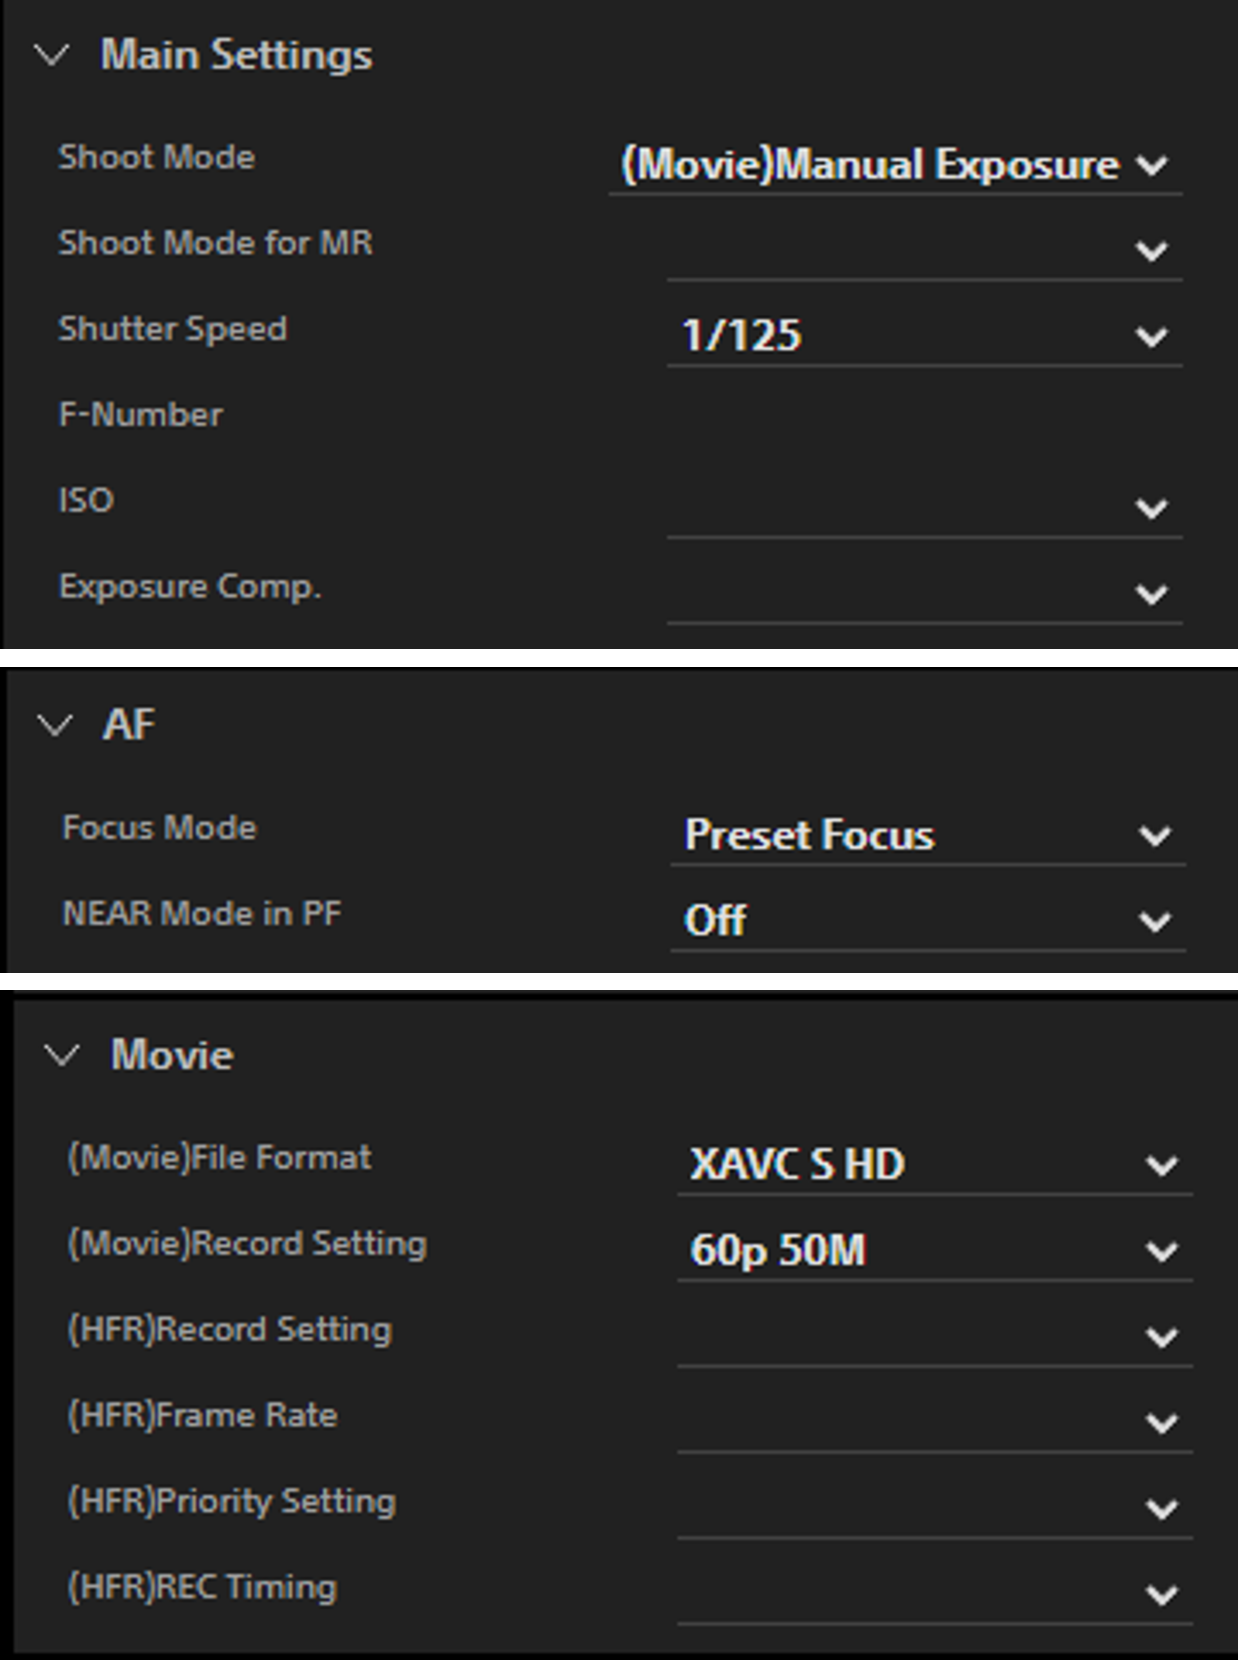
- Shoot Mode: (Movie) Manual Exposure
- Shutter Speed: 1/125
- Focus Mode: Preset Focus
- NEAR Mode in PF: Off
- (Movie) File Format: XAVC S HD
- (Movie) Record Setting: 60p 50M (interpreted as 60Hz @ 50 MB/s)
For recording movements faster than walking, consider changing the (Movie) Record Setting to 120p 100M and increasing the Shutter Speed to 1/250 s.
Recording a trial
Instructions:
- Select all cameras.
- Check the battery, Video-Sync, and TC-Sync status of all cameras. Batteries should have at least two bars (otherwise cameras may turn off during recording). Video-Sync and TC-Sync indicators should be present at all times.
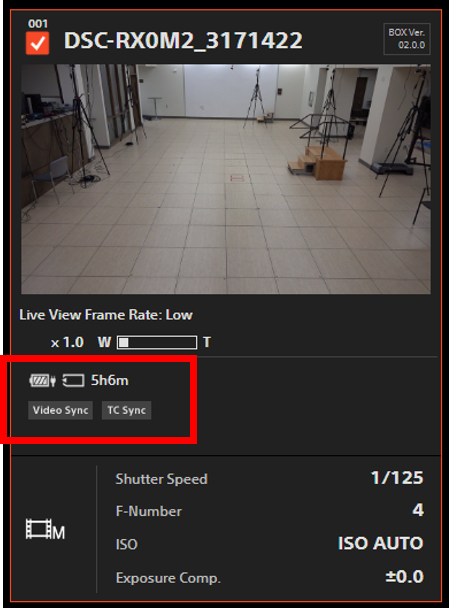
Notes:
- Video-Sync indicates that the camera exposures are synchronized.
- TC-Sync indicates that the camera time-codes are synchronized.
- If cameras have low batteries, put the cameras on standby and let the batteries recharge for at least 15 minutes. Alternatively, swap the batteries out of the cameras with fully-charged spare batteries.
- The total available recording time is displayed in hours (h) and minutes (m) next to the memory card icon.
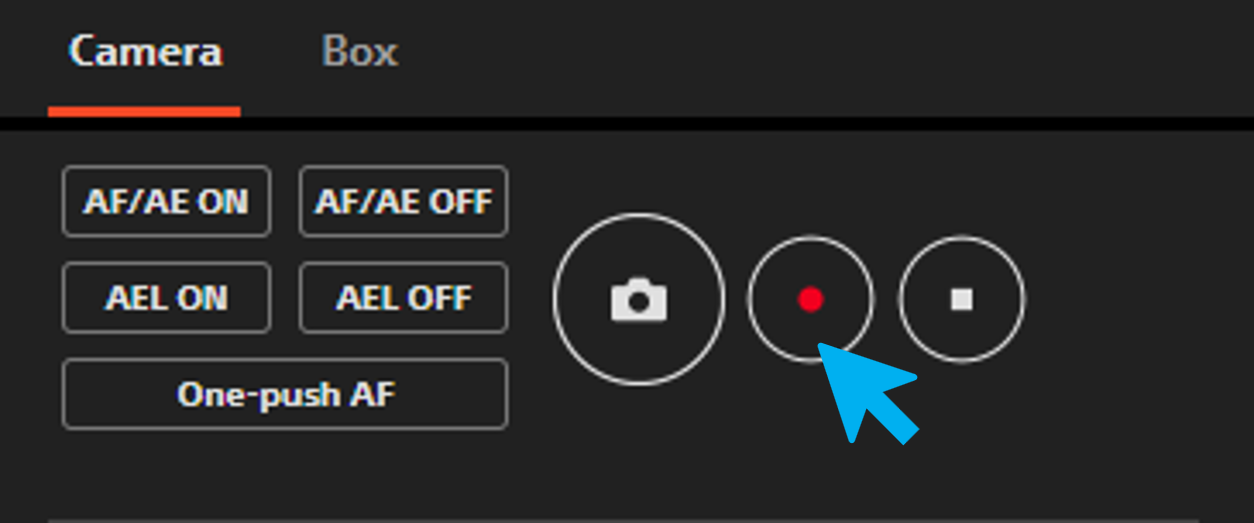
- Click the record button located on the top right corner of the Sony Control Box interface to start recording videos.
- Before performing the trial, show the calibration QR Code or Encounter ID QR Code to a designated camera. Hold the QR code a few inches away from the camera, making sure the entire QR code is within view. Be mindful of glare or dark screens that would limit the QR code's visibility.
- Perform the calibration trial or functional trial.
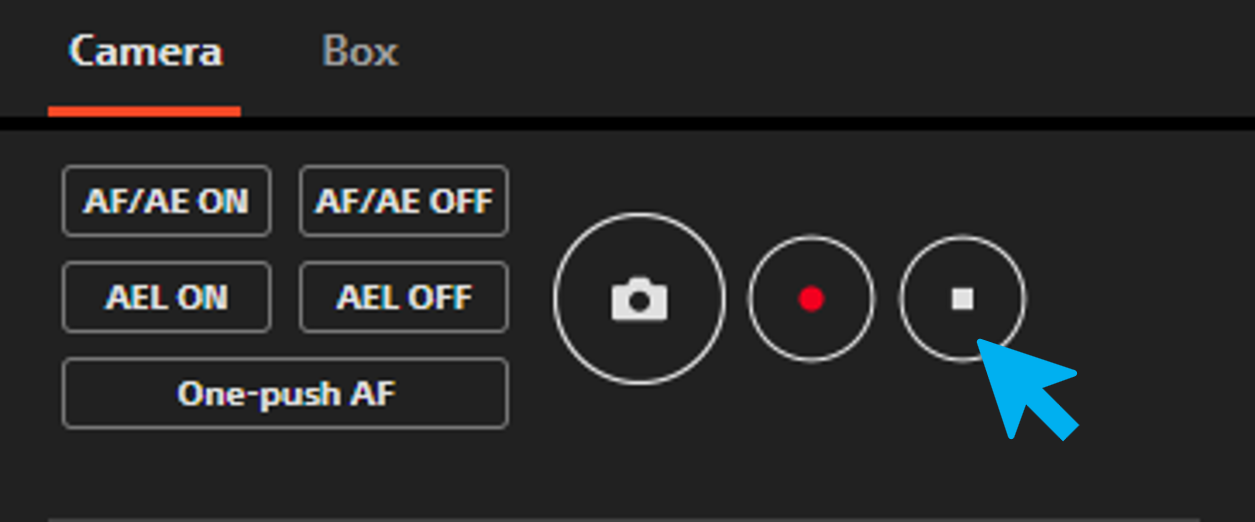
- Click the stop button to stop recording videos.
- Document the trial in the subject-action-assignment sheet.
Exporting Videos
Instructions:
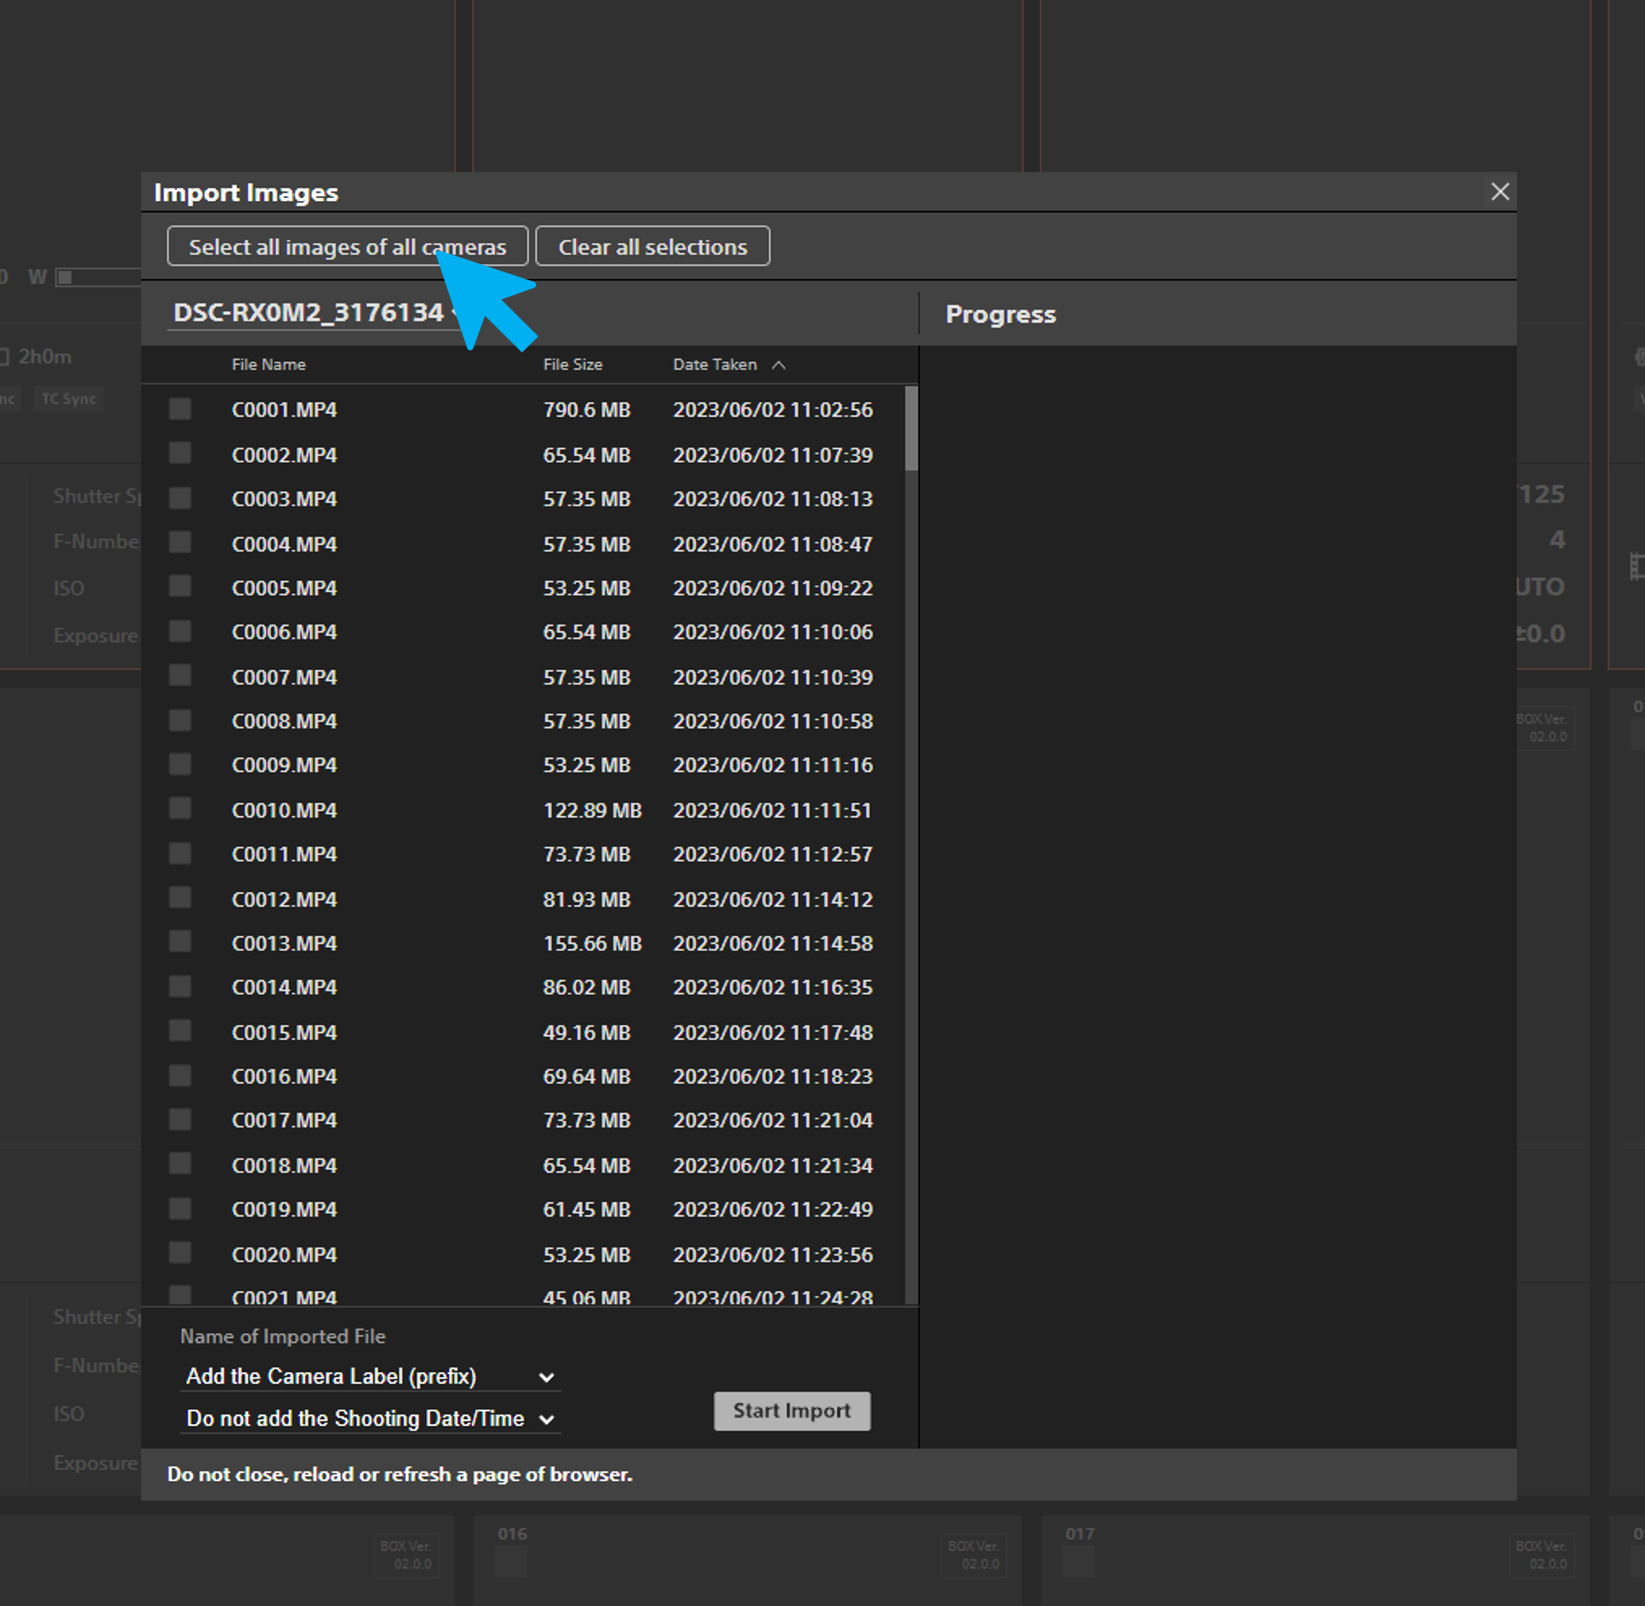
- Begin importing videos from the cameras by clicking on the Select button.
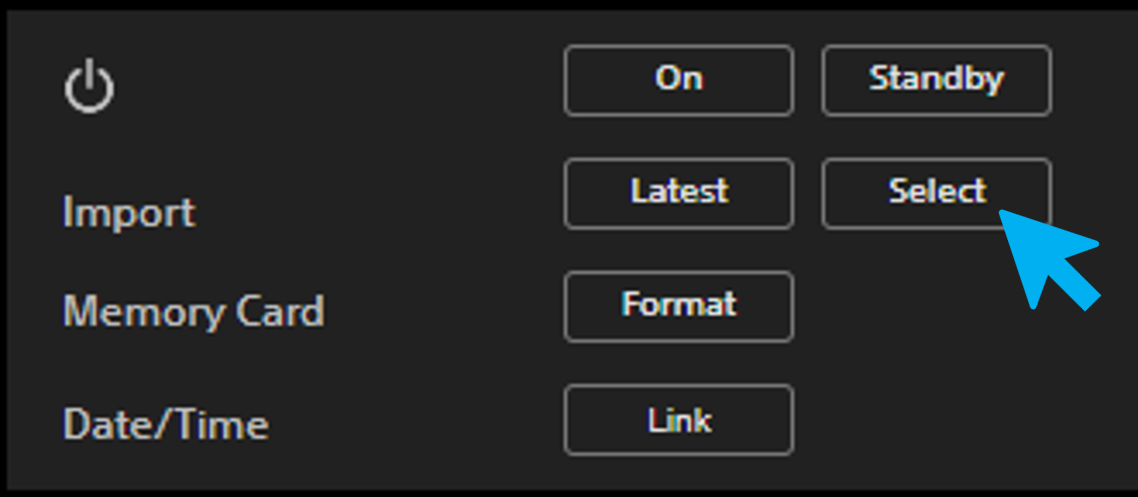
- In the Import Images window that opens, click Select all images of all cameras. This selects all videos stored in each camera to prepare them for downloading. The videos can be cycled through each camera (using the dropdown menu) and selected/deselected by clicking the checkboxes.
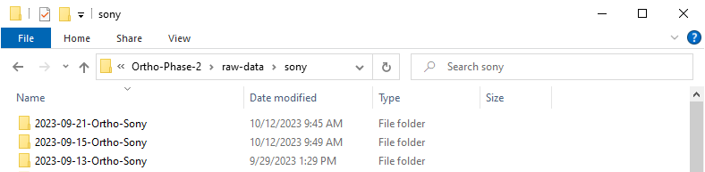
- Before downloading the videos, set the download destination by navigating to the web browser settings and choosing a download folder. Create a download folder on the server database with a folder name that follows the session date, for example, YYYY-MM-DD-Ortho-Sony.
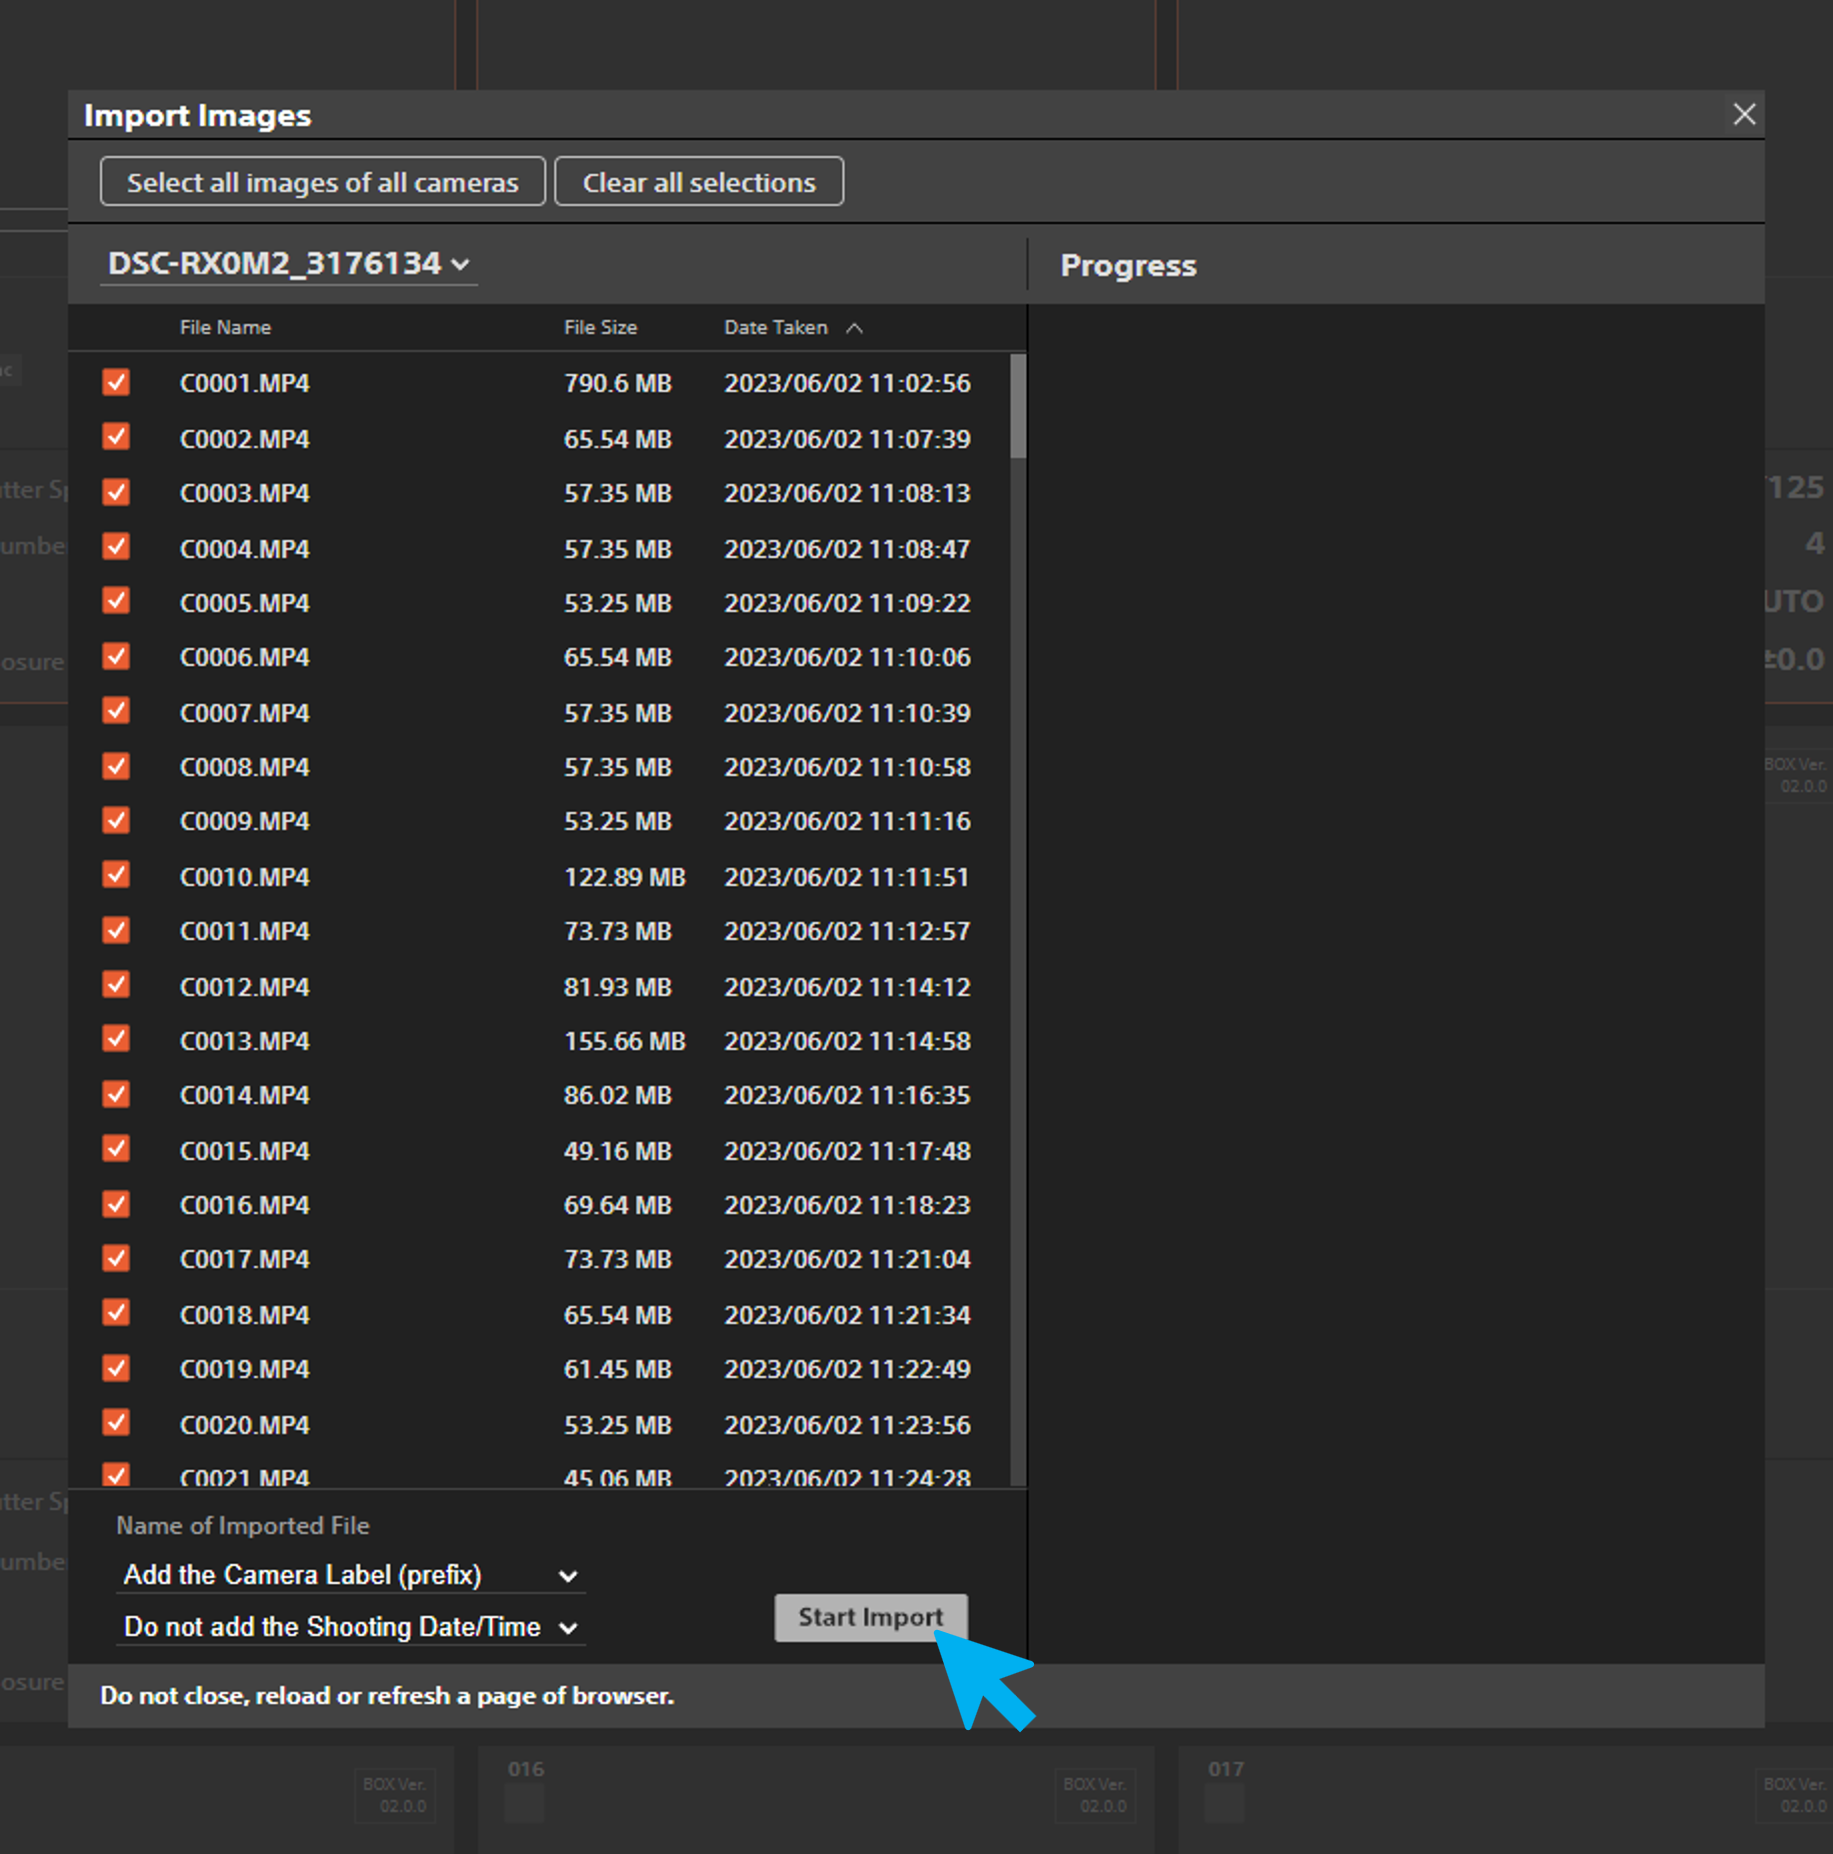
- At the bottom of the window, click Start Import. This will begin downloading the videos via the web browser to the selected download folder. For particularly long sessions, it's best practice to download the videos overnight.
Documenting subject-action-assignments
It's important to document each video trial in a subject-action-assignment sheet. The subject-action-assignment sheet is used in Theia3D to automatically organize each session into an appropriate folder hierarchy. It is also useful for researchers as a reference for the order of tasks completed during the session.
Instructions:
- Open a new workbook in a spreadsheet program (e.g. Microsoft Excel, Google Sheets, etc.)
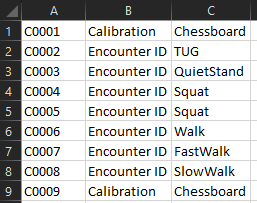
- In the first column, enter C0001. This refers to the file name of the first video stored in the cameras. This numbering continues for the next video as C0002, C0003, and so on.
- In the second column, enter " Calibration" (if it's a chessboard calibration trial) or the participant's Encounter ID, for example, E21-123-1-100.
- In the third column, enter the activity name such as TUG, QuietStand, Squat, Walk, FastWalk, or SlowWalk.
- Finally, save the file as a comma separated value ( .csv) in the session folder where the videos will be downloaded.
The subject-action-assignment sheet should look something like this:
The subject-action-assignment template can be downloaded here: YYYY-MM-DD-Ortho-Sony-subject-action-assignment.csv
Recording Chessboard Calibrations
Page overview:
Recording a chessboard calibration trial
Recording a chessboard calibration trial is an important step for collecting useful data with the markerless motion capture system.
The calibration trials are used for:
- Defining the position and orientation of the lab origin coordinate system for processing data in Theia3D.
- Defining the position and orientation of each camera in the markerless motion capture system.
Calibration trials are often performed at the start of the day and the end of the day to keep track of any changes in camera positions and orientations throughout the day. There are a few important things to keep in mind when performing calibration trials. We highly recommend watching the following video to familiarize the process:
Example video of a chessboard calibration in the Human Mobility Research Lab:
Instructions:
- Navigate to 169.254.200.200 on a web browser to access the Sony Camera Control Box interface.
- Turn on all Sony RX0 II cameras.
- If this is the start of the day, format (erase) the memory cards. If this is the end of the day, continue to the next step.
- Check battery, Video Sync, and TC Sync status on all cameras.
- Check camera system settings: we strongly suggest recording at 60Hz @ 1080p, with a shutter speed of 1/125 s (Theia Markerless Inc. recommends a lower frame rate of 20Hz).
- Lay the chessboard on the ground, keeping in mind that the chessboard must be clearly visible in at least 2 camera views (squares and intersection points clearly visible).
The global coordinate system will be determined by the position and orientation of the chessboard.
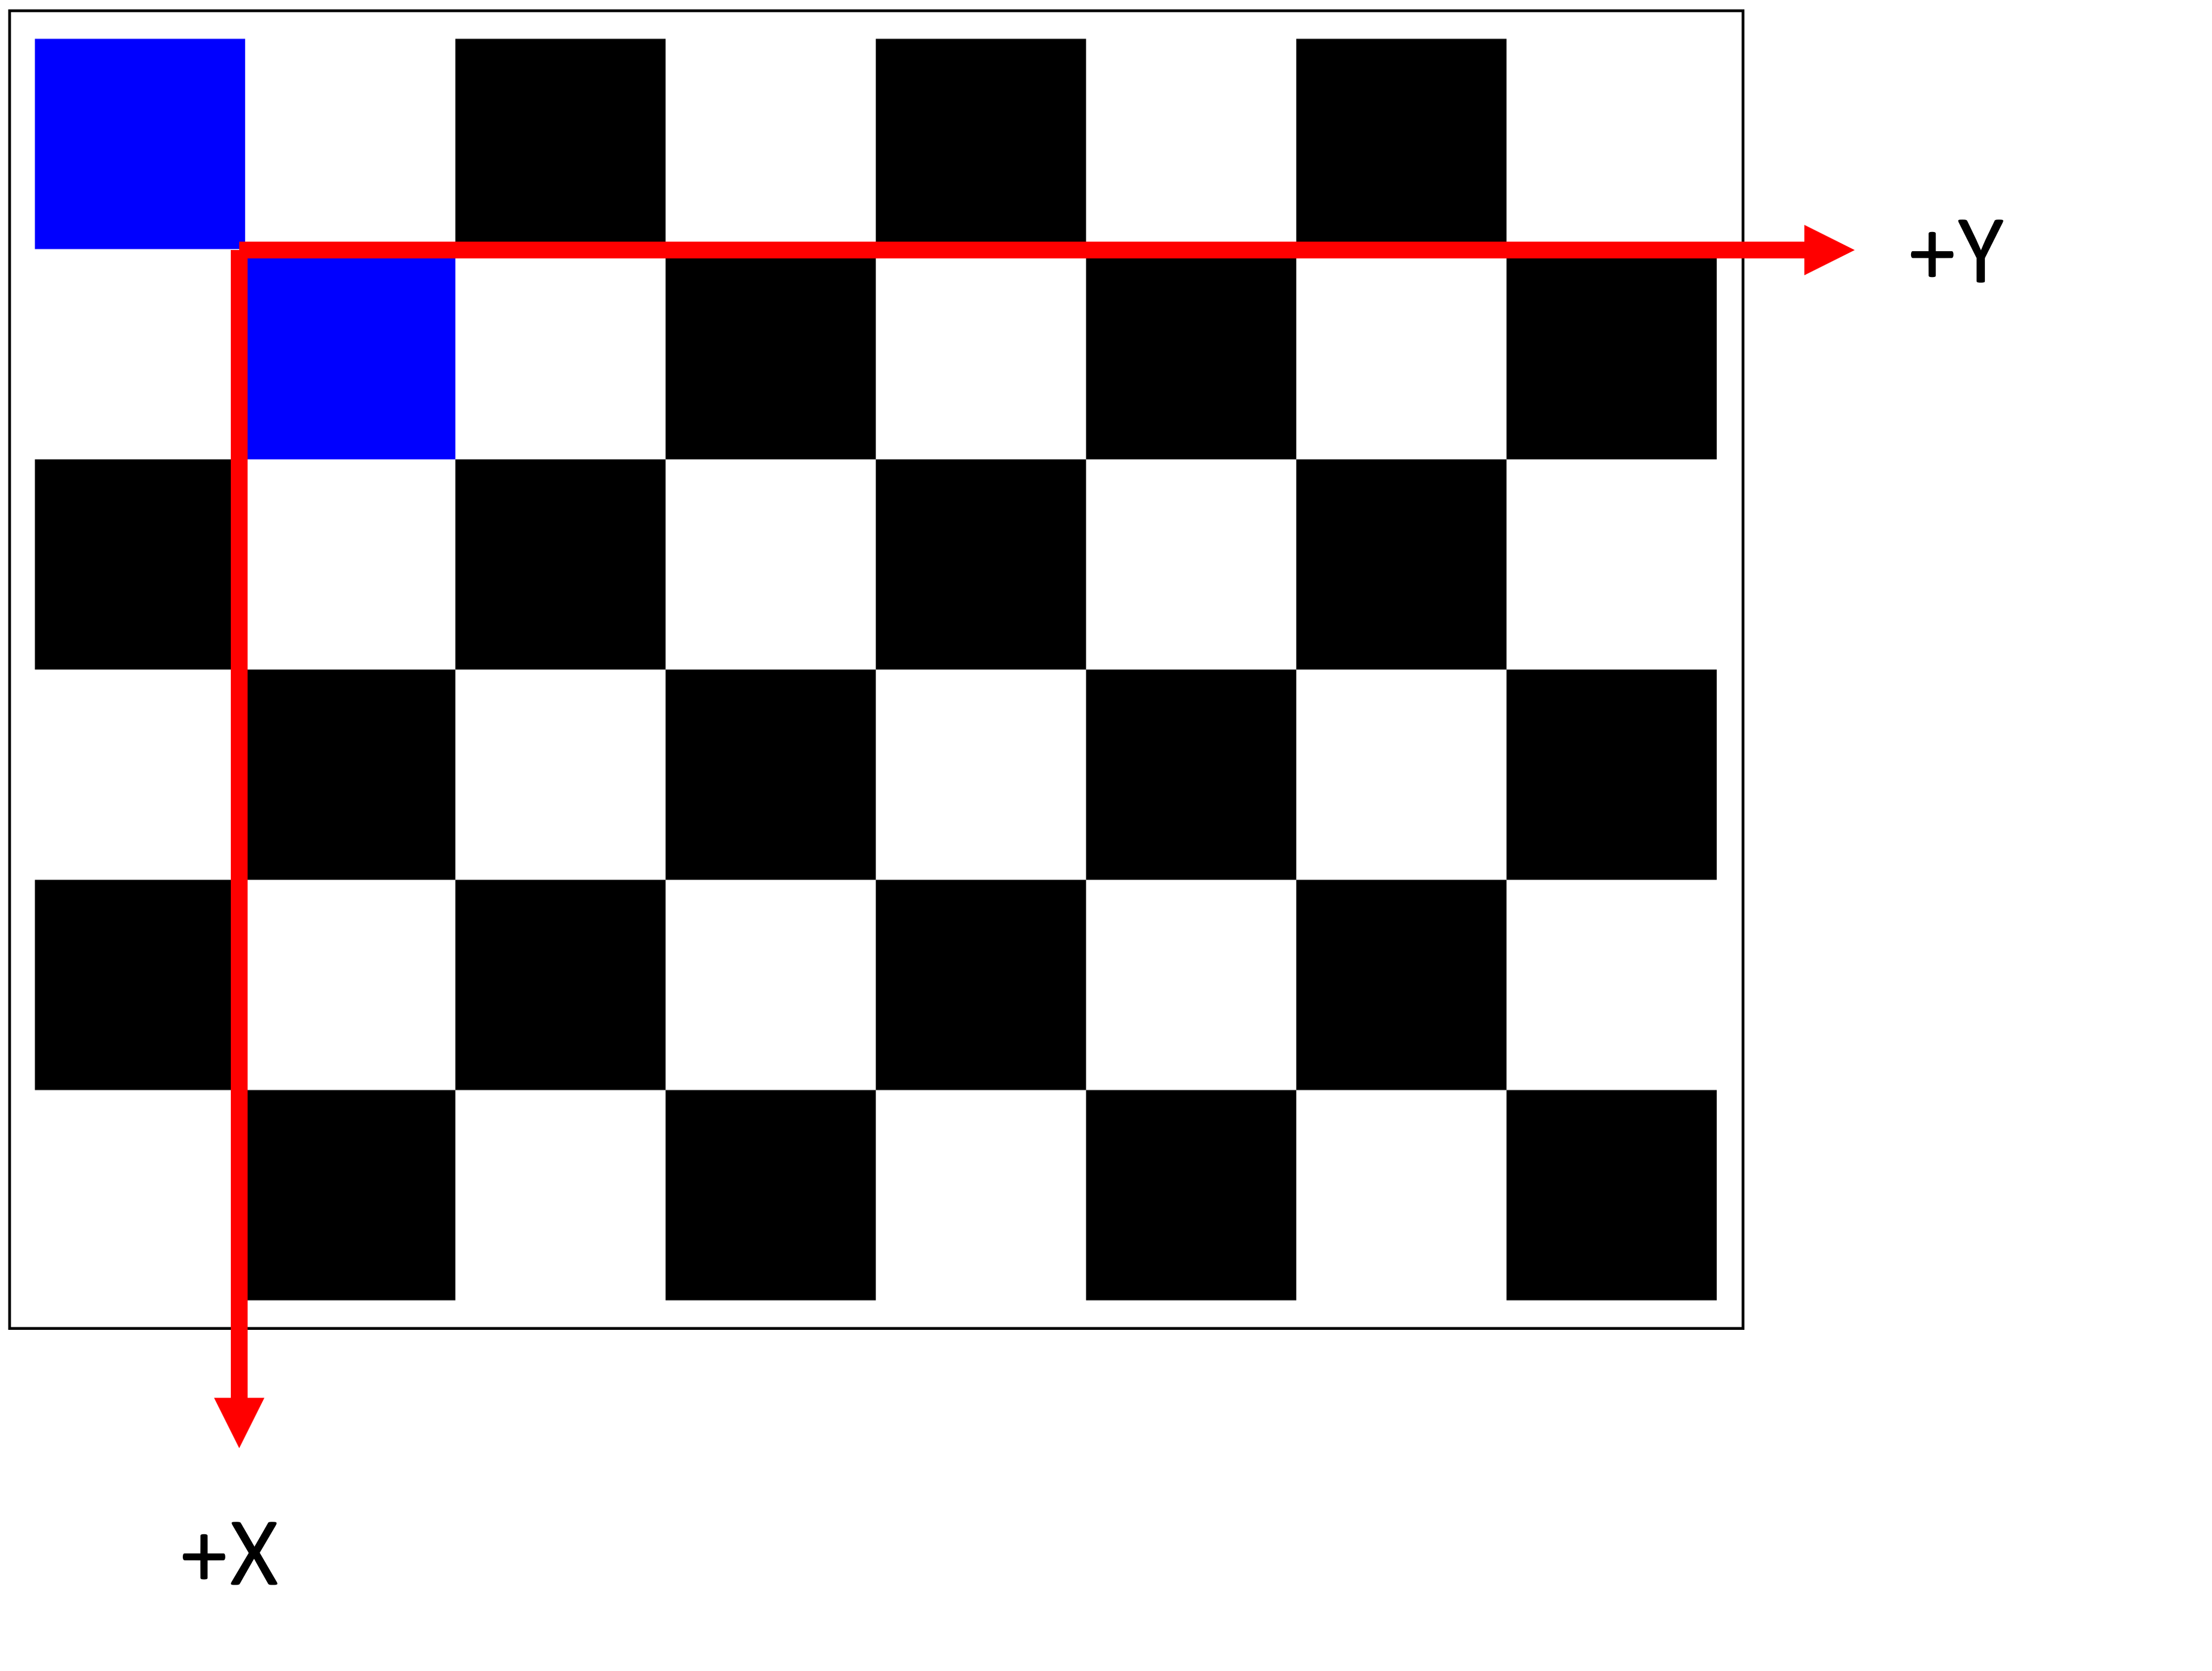
Notes:
- The position of the origin (0, 0, 0) is defined at the intersection of the blue squares of the chessboard.
- The positive Y-axis is defined along the length of the chessboard.
- The positive X-axis is defined along the width of the chessboard.
- Following the right-hand rule, the positive Z-axis points towards the reader orthogonally to the X and Y axes.
- Clear the volume and ensure no objects are interfering or obstructing the cameras' field of view.
- Select all cameras and start recording.
- Show the Calibration QR Code to a designated camera before performing the calibration trial. The Calibration QR Code can be downloaded from calibration-qr-code.png, displayed below:
- Perform the calibration trial. Show the chessboard to groupings of 3+ cameras, with overlap between groupings. Vary the angle of the chessboard while calibrating.
- Place the chessboard on the ground at the same position and orientation as the start of the trial.
- Select all cameras and stop recording. The calibration trial should be 2 to 3 minutes long to ensure plenty of frames have captured the chessboard.
- Turn off all cameras.
Common issues causing calibrations to fail
- Performing the calibration trial too quickly. This issue can be two-fold: moving too fast causes motion blur therefore decreasing the visibility of the chessboard, and a shorter trial means fewer frames where the chessboard is visible. Fix: move slowly and deliberately. Try to aim for 2 to 3-minute-long calibration trials.
- Failure to show the chessboard to groupings of 3+ cameras and/or overlapping the views during transitions. This issue causes Theia3D to have difficulty calculating the 3D position and orientation of the chessboard because the chessboard needs to be visible in at least 3 camera views. Fix: be mindful about making sure the chessboard is within view of 3+ cameras when performing the calibration trial. It is helpful to have another Study Staff at the computer to give feedback on the chessboard's visibility.
- The chessboard is not clearly visible in at least 2 camera views where the chessboard is placed on the ground. This issue is typically caused by the cameras being too far away from the chessboard or incident angles being too sharp to clearly see the chessboard. Fix: choose a location for the chessboard that is clearly visible in at least 2 camera views. Review calibration trial videos to check the visibility of the chessboard.
- The capture volume is too bright or too dark. Lighting issues causing the chessboard to not be clearly visible (squares or intersecting lines not clearly delineated) means that Theia3D will have difficulty detecting the chessboard. Fix: modify the capture volume lighting so that it's not too brightly lit or too dark. Review calibration trial videos to check the visibility of the chessboard.
- There is more than one chessboard visible in the calibration trial. This issue is typically caused by highly reflective surfaces (like mirrors or windows) or a second calibration chessboard in the capture volume. This issue causes chessboard detections to fail in Theia3D because more than one chessboard was detected. Fix: ensure to remove or cover all interfering objects or surfaces from view in the capture volume.
Navigating REDCap
Page overview:
REDCap (Research Electronic Data Capture) is a secure web application for building and managing online surveys and databases. This is a service that needs to be installed and maintained by an institution's IT department as per the license agreement. To see if your institution is already partnered with REDCap, see: https://projectredcap.org/partners/
The MMOA uses two separate REDCap projects: the Multi-Centre Intake and Multi-Centre Visit Data. The Multi-Centre Intake will be used to collect personal, identifiable information about the participant (such as name and contact details) whereas the Multi-Centre Visit Data project will be used for collecting de-identified information such as data collection notes. Each project is made up of multiple surveys which will be referred to here as instruments.
Multi-Centre Intake
Instruments:
- Eligibility Screening: in this instrument, the participant is screened for eligibility and their Ethics-Project-Subject (EPS) identifier is created (e.g. E1P1S1), which is unique to each participant.
When setting up this instrument for the first time, you will need to change the default values of the EPS. The lead institution (Human Mobility Research Lab, Queen's University) will provide the default values to you.
- Consent: this instrument contains the consent form that the participant will digitally sign. The signed consent form will be saved as a PDF in REDCap after Study Staff completes their portion of the form. Study staff need to confirm that all of the participant's questions have been answered and verify that the consent form has been completed. Completed consent form PDF files can be found in the side menu bar under Applications > File repository > PDF Survey Archive.
When setting up this instrument for the first time, you will need to add your institution's consent form by editing the instrument and copying it into the indicated fields. The current setup is a suggestion and how the HMRL's Consent instrument is currently formatted - please modify it as necessary.
- Identifying Details: in this instrument, the participant enters their date of birth. There is an internal validation that hides the submit button until real dates have been inputted.
When setting up this instrument for the first time, the date validation must be activated by enabling the Hide Submit External Module.
- Contact Details: in this instrument, the participant enters their contact information, preferred name, and pronouns.
- Study Staff: this instrument is where the consenting Study Staff signs their name and role. There is a notes section where Study Staff can enter comments to document the consenting process, for example, if all questions have been answered and to verify that the consent has been completed. When a Study Staff completes this instrument, their name and role will be merged with the participant's consent PDF.
When setting up this instrument for the first time, merging of the consent form must be activated by enabling the Enable Multi-signature module.
- Xray Scoring: this is an optional instrument that can be used by radiologists to provide a Kellgren-Lawrence score for radiographic classification of osteoarthritis. Study staff will have to manually upload radiographic images to the instrument and enter the date the x-rays were taken.
When setting up this instrument for the first time, it's possible to limit the user rights/accessibility to this instrument for radiologists or orthopaedic surgeons.
Multi-Centre Visit Data
Instruments:
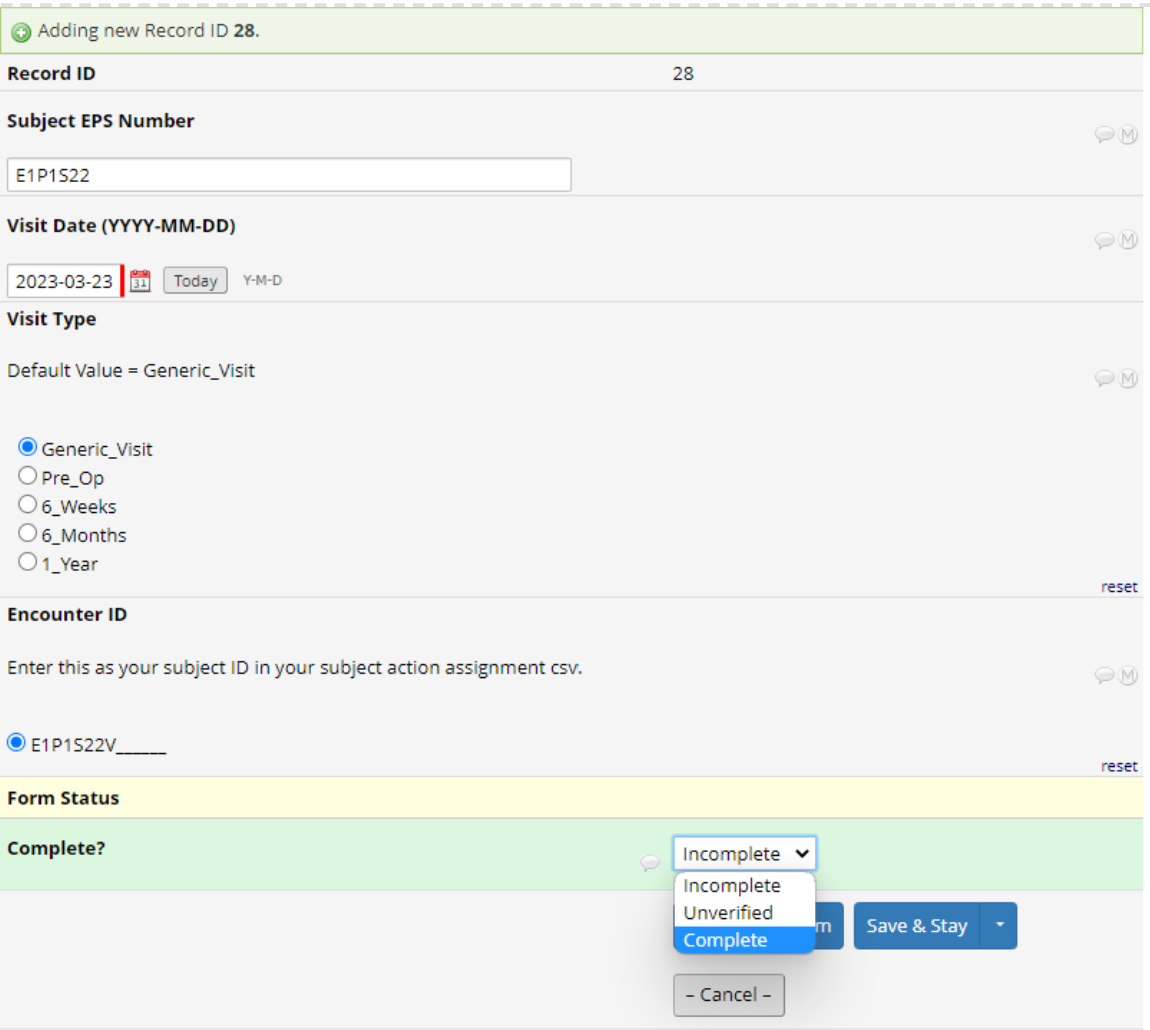
- Visit Info: this instrument generates the participant's Encounter ID, which is a combination of the participant's Ethics-Project-Subject (EPS) identifier and visit number. Study staff can also specify the type of visit here (e.g. pre-op, 6 weeks, post-op, etc.). Visit Type is set to Generic Visit by default.
If a participant is a repeat visitor, the Subject EPS Number and Visit Type fields will need to be entered by Study Staff.
- Demographics: in this instrument, participants self-report on their current age, race or ethnic origin, biological sex assigned at birth, gender, and their transgender status.
- Reason For Visit: in this instrument, participants enter the knee that they are seeing a healthcare provider for and self-report on additional conditions that may affect their balance (e.g. stroke, Parkinson's Disease, Multiple Sclerosis, etc.). It is important that the participant enters which knee(s) they are seeing a healthcare provider if they are a patient. Study Staff may want to supervise the participant in answering this question.
- Canada English Eq5d5l Redcap Self Complete v10: this instrument contains questions from EuroQol Group's EQ-5D-5L, which is a validated and licensed questionnaire to describe an individual's health.
- Satisfaction Knee Right/Left: this instrument contains a visual analog scale from 0 - 100 which asks participants how satisfied they are with their knee(s) today. If both knees are affected, the participant answers the questionnaire for each leg.
- Patient Acceptable Symptom State: this instrument asks participants, "If you were to remain in the next few months as you were the last 48 hours would this be acceptable or unacceptable to you?"
- Oxford Knee Score Right/Left: this instrument contains 12 questions about an individual's level of function, activities of daily living, and how they have been affected by pain over the preceding four weeks. If both knees are affected, the participant answers the questionnaire for each leg.
- QR-Code: this instrument displays an auto-generated QR-code that is created when the Encounter ID is created. Study Staff should use this QR code when displaying a participant's Encounter ID QR Code.
For repeat participants, this QR code will need to be generated by saving the Visit Info instrument.
- Surgical: in this instrument, Study Staff can enter a participant's surgical history and details, such as the name of the surgeon, case type, side of the body performed on, and patient diagnosis.
- Identifying Details Surgical: in this instrument, Study Staff can enter the date of the participant's surgery.
- Clinical Status: in this instrument, Study Staff can enter the participant's status of the currently affected knee, history of joint replacements, mobility impairments, and other details.
- Clothing Details: in this instrument, Study Staff can enter the participant's clothing details during the data collection session.
- Data Collection Checklist: in this instrument, Study Staff can enter the data collection details. The trials performed include TUG, QuietStand, Squat (knee bend), self-selected Walk, self-selected Fast Walk, and self-selected Slow Walk (for asymptomatic controls only). The Data Collection Checklist includes the expected names for each activity that should be recorded in the subject-action-assignment-sheet.csv.
Repeat participants
For participants that visit multiple times, it is important that their EPS identifier remains the same (since they are the same person), while their Encounter ID changes according to the visit number. Study Staff will have to enter the EPS identifier manually in the Multi-Centre Visit Data project to generate a new Encounter ID.
Please review the following video to see how to do this:
Instructions:
- In the Multi-Centre Intake project, select Record Status Dashboard, and locate the participant's record using their name or other identifying information.
- Locate and copy the participant's EPS identifier (e.g. E1P1S1).
- In the Multi-Centre Visit Data project, select Record Status Dashboard, and select Add new record.
- Click on the Visit Info status bubble and enter the EPS identifier in the Subject EPS Number field. The rest of the instrument should be filled out accordingly by Study Staff.
- Click on Save & Exit at the bottom of the Visit Info instrument.
Uploading Templates
Uploading a REDCap template is a quick and easy way to get your instruments ready for data collections with minimal user inputs. REDCap templates for the Multi-Centre and Markerless Orthopaedic Assessment project is provided by the Human Mobility Research Lab.
Instructions:
- To upload a new template for the first time, navigate to your institution's instance of REDcap. If you are using HMRL's instance, navigate to https://fhs.cac.queensu.ca/HMRL. If you need to create an account under the HMRL instance, please contact our PhD candidate Jereme Outerleys via email at jereme.outerleys@queensu.ca.
- Download the templates that we use for our project here:
- In REDCap, click on New Project near the top of the page.

- Enter the project details such as the project title (e.g. Multi-Centre Intake) and project's purpose (e.g. Research).
- In the Project creation option, select Upload a REDCap project XML file and upload the Multi-Centre-Intake-Template file previously downloaded.
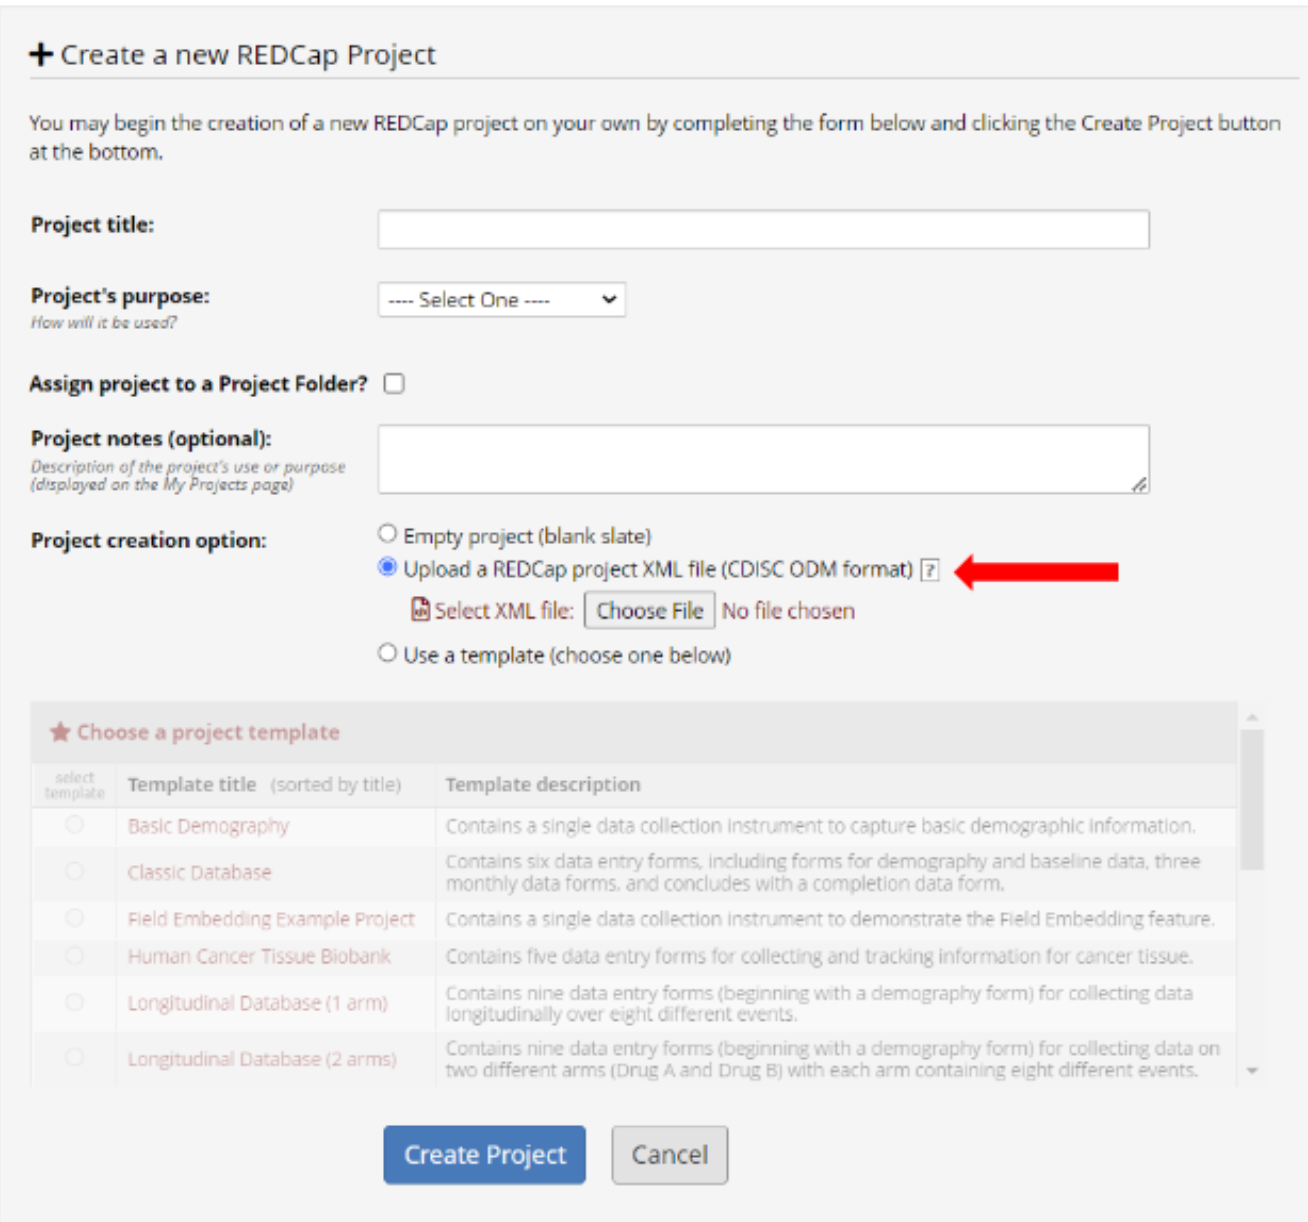
- Finally, click on Create Project.
- Repeat these steps for the Multi-Centre-Visit-Data-Template.
Task Descriptions
Page overview
For a printable version of the task instructions, see here: 2023-10-16 Task Instructions for Multi-Centre Markerless OA Project.docx
Timed-Up and Go (TUG)
Verbal instructions: You are going to start sitting in the chair, when you hear “Go”, stand up from the chair and walk at your normal walking speed, past the green line (until you are behind it), then turn around, walk back to the chair, and sit back down. We’re going to be doing a practice round first, and the second time, I’ll be recording. I’ll tell you when to go both times.
Are you ready? … Go!
Researcher's notes:
- Distance from front of chair to green line = 3 m
- Chair should have armrests, seat height of 44-47 cm
Video example:
Quiet Stand
Verbal instructions: Align your feet within the rectangles on the floor, making sure your toes are pointed forward and you are looking straight ahead. Stand with your arms crossed over your chest for 30 seconds. We will let you know when 10 seconds and 20 seconds have passed and then again when you are done.
We'll start recording starting from... now!
Researcher's notes:
- Rectangles (foot-sized) are set 10 cm apart
- Ask them not to speak during the recording if they are chatty :)
Video example:
Squat (Knee Bend)
Verbal instructions: Align your feet within the rectangles on the floor, making sure your toes are pointed forward, and your arms crossing your chest. When I say go, bend your knees gently, keeping your heels on the floor, and remembering to keep your chest upright. Then return to a standing position. It’s not supposed to be a deep squat, just a slight bend of the knees. We will do this task two times, and I will let you know when to start both times.
Are you ready? ... Go!
Researcher's notes:
- Show an example of this task
- Maximum knee bend <45 degrees - aim is to replicate the range of knee flexion during stance
Video example:
Walk
Verbal instructions: When I say go, walk back and forth from the red line to the red line at the end of the volume at your normal walking pace. We will do this for approximately 1 minute. I will tell you when to stop.
Are you ready? ... Go!
Researcher's notes:
- DO NOT notify them that there is a fast walk coming up
- 1 minute or 6 lengths whichever one comes first
- Distance between red lines is 9 m (30 ft)
- For analysis, we only use strides within the central 5 m (handled during post-processing)
Video example:
Fast Walk
Verbal instructions : When I say go, walk back and forth from the red line to the red line at the end of the volume, at a faster pace than your normal pace. This is a walk - please do not jog or run. Please do not hesitate to stop or slow down if you need to. We will do this for approximately one minute, and I will tell you when to stop.
Are you ready? ... Go!
Researcher's notes:
- 1 minute or 6 lengths whichever comes first
Video example:
Slow Walk (asymptomatic controls only)
Verbal instructions: When I say go, walk back and forth from the red line to the red line at the end of the volume at a slower pace than your normal walking speed. We will do this for approximately one minute. I will let you know when to stop.
Are you ready? ... Go!
Researcher's notes:
- 1 minute or 6 lengths whichever one comes first
Video example:
Stairs (for sites with access to stairs only)
Verbal instructions: Align your feet within the rectangles on the floor, making sure your toes are pointed forward, and your arms crossing your chest. When I say go, bend your knees gently, keeping your heels on the floor, remembering to keep your chest upright. Then return to a standing position. It’s not supposed to be a deep squat, just a slight bend of the knees. We will do this task two times, and I will let you know when to start both times.
Are you ready? ... Go!
Researcher's notes:
- • 3 total steps; step height: 17.5 cm; step width: 60 cm; tread depth: 30 cm
Video example:
Page Overview
- Quick links (leads to external pages)
On this page:
Initial Hardware Setup
Sony resources
Hardware checklist
The following hardware items are necessary to get started with a Sony RX0 II camera system:
- Sony RX0II cameras (minimum 6 per system)
- Sony CCB-WD1 control box (1 per camera)
- MicroSD card (1 per camera; class 10 or better recommended)
- PoE network switch (1 per system; 10 or more ports recommended)
- Cat6 ethernet cables (1 per camera + 1 cable to connect PoE network switch to computer)
- PoE ethernet-to-micro-USB splitters (1 per camera; minimum rated 5 V/2.4 A)
- A laptop or computer with an ethernet port (1 per system)
Recommended (optional) accessories:
- Male-to-Male 1/4” thumb screw (1 per camera; secures the control box to the camera)
- Magnetic mounts
- Tripods
Sony RX0 II camera setup
Instructions:
- (00:37) Remove the camera, battery, memory card protector, and microSD card from their packaging.
- (1:33) Open the battery cover and insert the battery into the camera.
- (1:54) Remove and detach the memory card/connector cover from the camera.
- (2:10) Insert the microSD card into the memory card slot in the camera.
- (2:20) Attach the memory card protector to the camera.
- (2:30) Turn the camera on.
- (2:35) Follow the on-screen prompts to set the language, area, date, and time.
- (3:00) Set the Shoot Mode to Movie Program Auto.
Navigate to MENU > Shoot Mode/Drive > Shoot Mode and select Movie Program Auto.
Note: there are two settings labeled ' Program Auto'. The correct setting is the one with a cat in the background.
- (3:21) Set the Audio Recording to Off.
Navigate to MENU > Movie2 > Audio Recording and select Off.
- (3:37) Set the Auto Power Off Temperature to High.
Navigate to MENU > Setup1 > Auto Power OFF Temp and select High.
- (3:58) Set the TC Format to NDF.
Navigate to MENU > Setup2 > TC/UB Settings > TC Format and select NDF.
- (4:13) Set the TC Run to Free Run.
Navigate to MENU > Setup2 > TC/UB Settings > TC Run and select Free Run.
Note: the NTSC/PAL selector must be set to NTSC for the timecode settings to be available.
Navigate to MENU > Setup2 > NTSC/PAL Selector.
- (4:20) Set the USB Connection to PC Remote.
Navigate to MENU > Setup3 > USB Connection and select PC Remote.
- (4:35) Turn the camera off.
- Repeat steps 1 - 13 for each camera.
Important: check that the Sony RX0 II camera firmware is up-to-date with the latest version downloadable from the Sony website: https://www.sony.com/electronics/support/compact-cameras-dsc-rx-series/dsc-rx0m2/downloads.
Navigate to MENU > Setup5 > Version
As of 2023-10-06, this latest version is Ver. 3.10 (release date 2021-11-08)
Sony CCB-WD1 control box setup
Instructions:
- (5:51) Remove the camera control box, cable protector, short multi-terminal connector cable, and PoE splitter from their packaging.
- (6:14) Pass the thick end of the multi-terminal connector cable and both branches from the PoE splitter through the cable protector.
- (6:35) Connect:
(i) The multi-terminal connector cable to the multi-port of the control box,
(ii) The micro-USB branch of the PoE splitter to the DC-in port of the control box, and
(iii) The ethernet branch from the PoE splitter to the data port of the control box.
- (7:06) Secure the cable protector to the control box using the attached thumb screws.
- (7:23) Pass the cables through the slot on the side of the cable protector and secure the cap.
- (7:34) Ensure that the Master/Client switch is set to Client and the On/Off switch is set to Off
- Repeat steps 1 - 7 for each control box
Important: check that the Sony CCB-WD1 control box firmware is up-to-date with the latest version downloadable from the Sony website: https://www.sony.com/electronics/support/compact-cameras-dsc-rx-series/dsc-rx0m2/downloads.
Navigate to MENU > Setup5 > Version
As of 2023-10-06, this latest version is Ver. 2.00 (release date 2019-04-10)
Connecting the system
Instructions:
- (8:00) Connect the PoE switch to a dedicated network card on the computer via ethernet cable.
- (8:23) Connect each control box and camera pair together using a male-to-male 1/4" thumb screw.
- (8:50) Plug the multi-terminal connector cable into the micro-USB port in the camera.
- (9:03) Plug one end of the Cat6 ethernet cable into the PoE splitter that is connected to the control box.
- (9:17) Plug the other end of the Cat6 ethernet cable into the PoE network switch.
- (9:27) Set one of the control box Master/Client switch to Master, and set the rest as Client.
- (9:38) Turn all On/Off switches on control boxes to On.
Final Setup using Sony control box interface
Instructions:
- (10:00) On a web browser (e.g. Google Chrome, Microsoft Edge, Mozilla Firefox, etc.), navigate to 169.254.200.200 in the web address.
- (10:40) Update the firmware of the control boxes connected to the cameras.
- (13:28) Turn on all of the cameras connected to the control boxes.
- (14:19) Link the date and time of all cameras.
- (14:42) Initialize all of the control boxes.
Theia3D Tutorial Videos
Theia3D resources
Theia3D basics
Link: https://youtu.be/ezhZhUZZqCA
This tutorial video provides an overview of the basics when using Theia Markerless motion capture products, and should be your first stop in understanding Theia Markerless technology. It provides an overview of the Theia Markerless data collection and processing framework, with an overview of the main functionality of Theia3D that accomplishes this framework.
Data Collection Principles
Link: https://youtu.be/I5cTaQjn-2c
This Theia Markerless tutorial video describes the key factors that should be considered when setting up a capture volume and collecting data, including camera position, orientation, settings, subject, attire, and movement considerations.
Recording Intrinsic Lens Calibrations
Link: https://youtu.be/19EWW3Qk-Cs
This Theia Markerless tutorial video provides step-by-step instructions and tips for recording high-quality intrinsic lens calibration trials, which are required to determine intrinsic lens parameters.
Recording Extrinsic Chessboard Calibrations
Link: https://youtu.be/IgjZKh7kcHA
This Theia Markerless tutorial provides step-by-step instructions and tips for recording high-quality extrinsic chessboard calibration trials, which are required to determine the extrinsic camera system parameters and run analyses in Theia3D. This is the preferred extrinsic calibration method, over object calibration. If you are using a third-party wand calibration method, you do not need to record and process extrinsic chessboard calibrations.
Recording Extrinsic Object Calibrations
Link: https://youtu.be/ofBnt8kGViY
This Theia Markerless tutorial video provides step-by-step instructions and tips for recording high-quality extrinsic object calibration trials. Note: This is not the recommended method of calibration, and instead we recommend that you use the chessboard calibration procedure.
Theia3D User Interface
Link: https://youtu.be/w9gVEry6Zqc
This Theia3D tutorial video describes the layout of the Theia3D application user interface and where its many functions and tools are located.
Organizing Videos
Link: https://youtu.be/SjbOULS6kVs
This Theia3D tutorial video describes how to use the Organize Videos tool to format unorganized video data, which is the very first step in processing any markerless data in Theia3D.
Processing Extrinsic Chessboard Calibrations
Link: https://youtu.be/nVTXobmJWhQ
This Theia3D tutorial video describes how to use the Chessboard Calibration tool within Theia3D to process extrinsic chessboard calibration trials. This is the preferred extrinsic calibration method, over object calibration. If you are using a third-party wand calibration method, you do not need to record and process extrinsic chessboard calibrations.
Processing Extrinsic Object Calibrations
Link: https://youtu.be/PhN-tF6_pG4
This Theia3D tutorial video describes how to use the Object Calibration tool within Theia3D to process extrinsic object calibration trials. Note: This is not the recommended method of calibration, and instead we recommend that you use the chessboard calibration procedure.
Adjusting Chessboard Calibration Reference Frames
Link: https://youtu.be/7SPj8j0WWVs
This Theia3D tutorial video provides an overview of how to adjust a global reference frame manually, after processing an extrinsic chessboard calibration trial. This may be useful if the reference frame is in an undesired location.
Assigning Calibration Files
Link: https://youtu.be/DY6PmVaImG8
This Theia3D tutorial video summarizes the process for assigning calibration files to movement data using the Assign Calibration Tool in Theia3D. This is considered best practice and is a requirement for batch processing movement trials.
Analyzing Data
Link: https://youtu.be/oZnnwb_8zlU
This Theia3D tutorial video provides an overview of the basic steps required to analyze a single movement trial from start to finish, using the sidebar quick tool buttons. This includes loading video data, loading a calibration trial, running the analysis, and saving analysis outputs.
Analyze Dropdown Menu
Link: https://youtu.be/drNfF3T1REc
This Theia3D tutorial video provides a summary of the Analyze dropdown menu and each of the individual analysis steps it contains. This can be useful when running individual analysis steps.
Display Dropdown Menu
Link: https://youtu.be/Viy9ywxF__g
This Theia3D tutorial video describes the visualization and display options that can be toggled using the buttons in the Display dropdown menu.
Video Enhancement Tool
Link: https://youtu.be/mYuKrTVbUbU
This Theia3D tutorial video describes the Video Enhancement tool and how it can be used to modify videos before processing them in Theia3D.
Saving
Link: https://youtu.be/uxi0Q6KNvcs
This Theia3D tutorial video provides an overview of the different saving options available in Theia3D.
Settings
Link: https://youtu.be/POkn3jxyilE
This Theia3D tutorial video describes the settings that can be adjusted within Theia3D, under the Settings dropdown menu.
TMBatch User Interface
Link: https://youtu.be/1AiWndrQ5Pc
This TMBatch tutorial video describes the layout of the TMBatch companion application user interface and where its functions and tools are located.
Managing Preferences
Link: https://youtu.be/85dWbSFl1rM
This TMBatch tutorial video describes the process used to modify, save, copy, and paste preferences files within the TMBatch companion application. The practices described in this video are best practices for managing preferences within TMBatch, and are critical for batch processing movement data.
Setting up a Batch
Link: https://youtu.be/P-pDp4vEgow
This TMBatch tutorial video provides an overview of the TMBatch companion application to Theia3D, and how to use it to batch analyze multiple movement trials. This includes the basic required steps for setting up and starting a batch analysis, including choosing the batch directory, selecting the batch output options and analysis preferences, and fine-tuning the batch analysis trial list.
Theia3D Workspaces
Link: https://youtu.be/ffG7lCPJ8k8
This Theia3D tutorial video provides an overview of how to save, open, and navigate within Theia3D workspaces, as well as the data that they contain.
Theia3D in Visual3D
Link: https://youtu.be/FXL1Tb8g_HM
This Theia3D tutorial video demonstrates how movement data processed in Theia3D can be loaded and analyzed in Visual3D, including a description of the automatic Visual3D model applied, and the signals contained in Theia3D output pose .c3d files.
Saving Video Overlays
Link: https://youtu.be/qHPaBDrJVtU
This Theia3D tutorial video demonstrates how to save out videos from Theia3D, including modifying the visualization settings that affect the saved video. This includes saving 2D video overlays and 3D viewer videos.